

Spider Web Cookie Stamp Cookies Easy Recip | Fun Halloween
As autumn arrives and nights get longer, the excitement for Halloween grows. Decorating and baking festive treats is a big part of the fun. This year, try making these spooky Spider Web Cookie Stamp Cookies. They’re easy to make and loved by all ages.
Table of Contents
Key Takeaways
- These spider web cookies are a fun and easy Halloween treat to make at home.
- The recipe yields approximately 20 sugar cookies using a simple circular cookie cutter.
- The tutorial provides detailed step-by-step instructions for decorating the cookies with a spooky spider web design.
- The cookies can be customized with different color combinations and patterns to suit your Halloween theme.
- The class includes a 2-hour video tutorial and a 72-page workbook, making it a comprehensive learning experience.
Essential Supplies and Ingredients for Spider Web Cookies
Making spider web cookies for Halloween is fun. You need some basic baking tools and ingredients. We’ll help you find the right cookie stamp and decorations.
Baking Tools and Equipment
Here’s what you’ll need to make your spider web cookies:
- A spider cookie cutter or circle cutter to shape your cookies
- A nonstick pizza pan or baking sheet lined with parchment paper
- 3 icing bags and 3 couplers to pipe the web design
- Wilton tip sizes #2, #4, and #12 for intricate piping
- A palette knife for smoothing and shaping the dough
Required Ingredients
Here’s what you’ll need for the perfect spider web cookies:
- Sugar cookie dough (homemade or store-bought)
- Crusting buttercream recipe for the frosting
- Black and purple gel food dyes for the spooky web design
- Decorators gel for adding the final touches to your masterpiece
Decorating Supplies
Enhance your spider web cookies with these decorations:
| Item | Purpose |
|---|---|
| Spider cookie cutter | Cut out spider shapes to adorn your cookies |
| Black and purple gel food dyes | Add vibrant, spooky colors to your web design |
| Decorators gel | Create intricate web designs and other Halloween details |
With these supplies and ingredients, you’re ready to make delicious spider web cookies. They’ll be a hit at your Halloween party.
Spider Web Cookie Stamp Cookies Easy Recip: Step-by-Step Guide
Making cookie recipe for Halloween is easy with this step-by-step guide. These Spider Web Cookie Stamp Cookies are perfect for Halloween baking. They will make both kids and adults happy.
- Start by making your cookie dough. Mix dry ingredients like flour, baking powder, and salt in one bowl. In another, cream butter and sugar until it’s light and fluffy.
- Slowly add the dry ingredients to the wet ingredients. Mix until it’s smooth. Then, chill the dough for 30 minutes to make it firm.
- Preheat your oven to 350°F (177°C). Line a baking sheet with parchment paper. Use a cookie stamp or round cutter to make circular shapes from the dough.
- Put the cookie shapes on the baking sheet, leaving space between them. Bake for 10-12 minutes, until the edges are golden.
- While the cookies bake, make your buttercream frosting. In a bowl, mix softened butter, confectioners’ sugar, milk, and vanilla until it’s smooth.
- After the cookies cool, spread buttercream frosting on each one. Use an offset spatula or piping bag.
- To make the spider web design, use a toothpick or small piping bag. Draw circles from the center outwards. Add a dot in the center for the spider.
| Ingredient | Quantity |
|---|---|
| Sugar Cookie Dough | 1 batch |
| Buttercream Frosting | 2 cups confectioners’ sugar, 2 tbsp softened butter, 2 tbsp milk, 1/2 tsp vanilla extract |
| Decorating Supplies | Black decorators gel, toothpick |
Enjoy your Spider Web Cookie Stamp Cookies. Share them with friends and family for a delicious Halloween!
Preparing the Perfect Cookie Dough Base
To make the perfect base for your spider web cookies, start with a classic no-spread sugar cookie dough. This dough keeps its shape well when baked, making sure your spider web design stays clear. The trick is in how you mix and keep the dough just right.
Mixing Techniques
First, cream the butter and sugar until it’s light and fluffy. Add a room-temperature egg and a bit of vanilla for taste. Then, mix in the flour and baking powder slowly. Be careful not to mix too much, as this can make the cookies tough.
Dough Consistency Tips
- The dough should be soft but firm enough to hold its shape.
- If it’s too sticky, add a bit more flour until it’s right.
- For too dry dough, add small amounts of water or milk to make it pliable.
- Chill the dough for at least 30 minutes before baking to prevent spreading.
By following these tips, you’ll get perfectly shaped, no-spread cookie dough recipe cookies. They’re ready to be turned into spooky spider web designs.
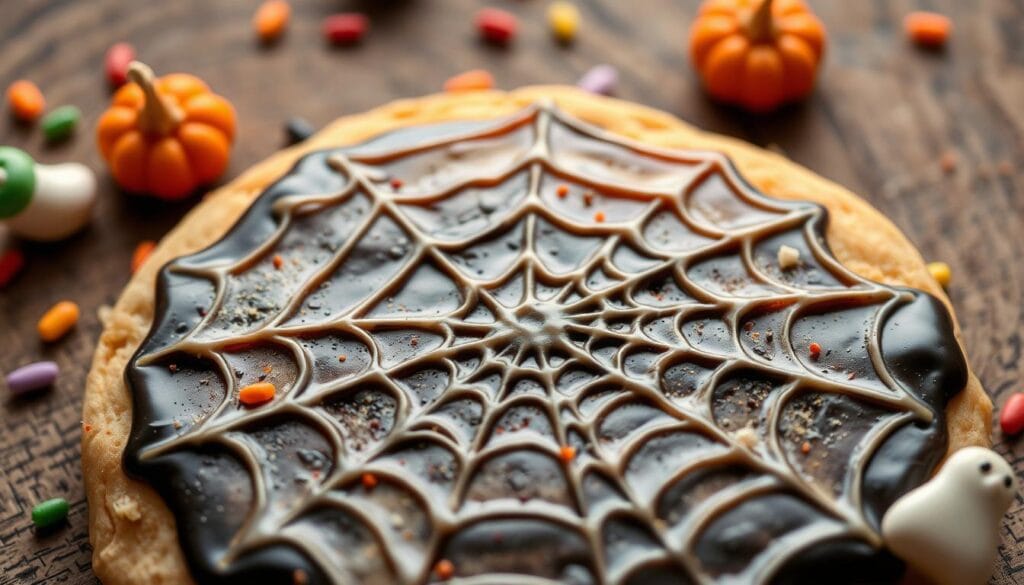
Creating the Spooky Spider Web Design
Unleash your inner artist and transform your cookies into a haunting spider web masterpiece! You’ll need white decorators gel or thinned royal icing. Start by piping concentric circles on the cookie, forming the base of your web.
Next, use a toothpick or a thin decorating tool to drag lines from the center of the cookie outward. This creates the intricate web effect. For added depth and dimension, consider using different shades of icing or incorporating small sugar pearls at the intersections of the web lines.
Mastering the spider web cookie decorating technique is all about precision and a steady hand. Practice makes perfect, so don’t be afraid to experiment and find the method that works best for you. With a little creativity and attention to detail, you can turn your baked goods into spooky Halloween treats that will impress your friends and family.
Remember, the key to achieving the perfect spider web design is patience and a touch of whimsy. Have fun with the process and let your inner pastry artist shine through. Unleash your creativity and transform your cookies into a delightful Halloween masterpiece!
Decorating Techniques for Halloween Cookies
Make your Halloween cookies spooky with these creative decorating tips. Use bold colors and intricate patterns to make your Halloween cookie decorating stand out. It’s all about letting your creativity shine.
Color Combinations
For spooky desserts, Halloween colors are key. Try bold combos like black and orange or go for purple and green. White and black is always a classic choice.
Pattern Application Methods
- Use tipless bags for fine details and precise piping.
- Try the wet-on-wet technique to blend colors for a seamless effect.
- Add a touch of sparkle with edible glitter to make your cookies shine.
- Experiment with different icing consistencies to achieve various textures and effects.
With creativity and the right tools, simple cookies become spooky masterpieces. Let your Halloween spirit guide you and enjoy the decorating process!
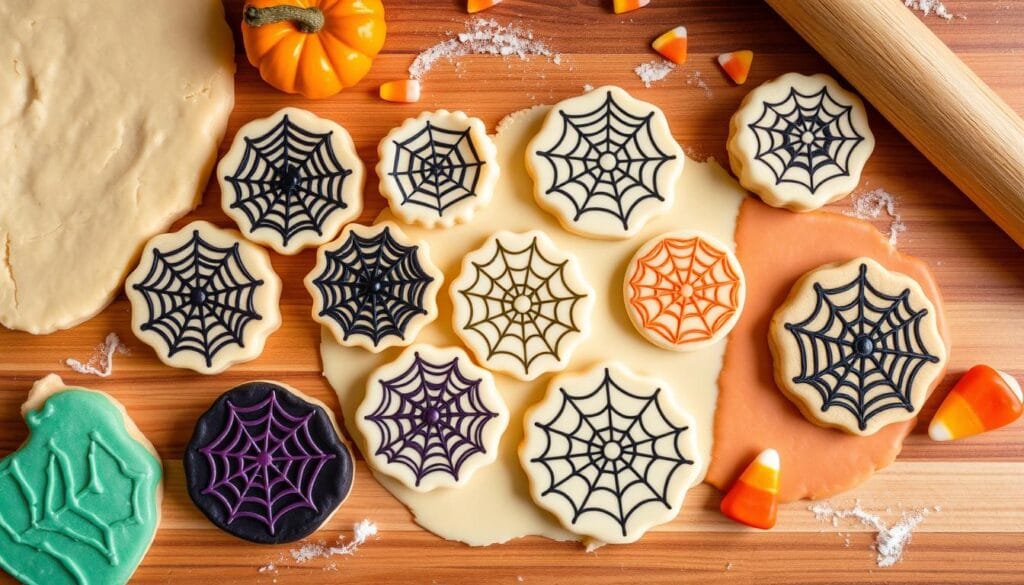
Tips for Working with Cookie Stamps
Want to make your cookies stand out? Here are some expert tips for using cookie stamps. Whether you’re making spooky designs or festive patterns, these tips will help you create amazing stamped cookies.
First, lightly flour your cookie stamp before pressing it into the dough. This trick prevents sticking and gives you a clean, clear design every time. Press the stamp firmly and evenly to get a sharp pattern that won’t fade during baking.
- Lightly flour the cookie stamp before use to prevent sticking.
- Press the stamp firmly and evenly into the dough for a clear imprint.
- Chill the stamped dough for about an hour before baking for best results.
- If the stamp design isn’t as prominent after baking, use icing to accentuate the pattern.
- Clean the stamp thoroughly between uses to maintain crisp, detailed designs.
For the best results, chill the stamped dough for about an hour before baking. This step helps the design stay sharp and prevents cookies from spreading too much. If the design isn’t clear after baking, use icing to make it stand out.
Don’t forget to clean your cookie stamps well between uses. This keeps them ready for the next design, ensuring your stamped cookies always look great.
| Technique | Tip |
|---|---|
| Stamping | Lightly flour the stamp before pressing into dough |
| Chilling | Chill stamped dough for about 1 hour before baking |
| Decorating | Use icing to accentuate the stamp design if needed |
| Cleaning | Thoroughly clean stamps between uses for crisp designs |
“Mastering the art of cookie stamp techniques can take your baking to new heights.”
Storage and Serving Suggestions
Keeping your homemade spider web cookies fresh is important. Store them in an airtight container at room temperature for up to a week. If you want to keep them longer, freeze the undecorated cookies for up to 3 months. This way, you’ll have cookies ready for future Halloween parties.
Maintaining Freshness
For the best taste, store your cookies in an airtight container at room temperature. This stops them from getting dry or stale. If freezing, wrap them tightly in plastic wrap or use a freezer-safe bag to keep their flavor and texture.
Display Ideas for Halloween Parties
When serving your spider web cookies, think outside the box. Use tiered stands or themed platters for a spooky display. Add fake cobwebs, plastic spiders, or LED candles to make it even more festive. Your cookies will be the highlight of any Halloween party.
| Cookie Variety | Calories | Fat (g) | Carbohydrates (g) | Protein (g) |
|---|---|---|---|---|
| Halloween Peanut Spider Cookies | 138 | 8 | 15 | 3 |
| Candy Corn Cookies | 83 | 5 | 10 | 1 |
| Halloween Sugar Cookies | 182 | 6 | 31 | 1 |
| Tombstone Treats | 358 | 15 | 55 | 4 |
| Raspberry Jam Halloween Cookie | 115 | 6 | 14 | 1 |
These nutrition facts show the calories and nutrients in different Halloween cookies. This helps health-conscious guests enjoy the party. Knowing the nutritional values lets you plan your Halloween party ideas to meet everyone’s dietary needs.
Troubleshooting Common Cookie Decorating Issues
Even the best bakers face problems when decorating cookies. Issues like icing that’s too runny or too thick, bleeding colors, and uneven surfaces can happen. But, with the right tips, you can solve these decorating challenges.
Icing Consistency Woes
If your icing is too runny, add powdered sugar slowly until it’s right. If it’s too thick, mix in a bit of water to thin it out.
Preventing Color Bleeding
To stop colors from bleeding, let each layer of icing dry fully before adding the next. This ensures a clean, sharp design.
Leveling Uneven Surfaces
For cookies with uneven icing, use a smoother or small offset spatula to level the icing while it’s wet. This will give you a smooth, professional finish.
| Issue | Solution |
|---|---|
| Runny Icing | Add more powdered sugar |
| Thick Icing | Mix in small amounts of water |
| Color Bleeding | Allow each icing layer to dry completely |
| Uneven Surfaces | Use a smoother or small offset spatula to level the wet icing |
By learning these cookie decorating tips and icing troubleshooting methods, you’ll make stunning, professional-looking cookies for any event.
Creative Variations and Design Ideas
Take your Halloween cookies to the next level with spooky and creative designs. Try out different shapes, textures, and flavors to really get into the Halloween spirit. You can make everything from classic pumpkins and ghosts to fun witches and monsters.
Check out the Halloween cookie designs that are getting more popular. These include vampire, zombie, and spider cookies. Also, don’t miss out on Frankenstein, Day of the Dead, and candy-themed cookies. They show off your baking talents.
Get creative with your cookies. Try marbling for cool effects or use edible markers for detailed designs. Add candies, sprinkles, and other toppings to make your cookies look amazing.
- Pumpkin Spice Cookies: Capture the essence of fall with pumpkin-flavored cookies adorned with orange icing and cinnamon sugar.
- Witch’s Fingers: Create spooky and whimsical cookies by shaping the dough into finger-like shapes and decorating with green icing and almond “nails.”
- Ghost Cookies: Cut out ghost shapes from the dough and decorate with white icing and candy eyes for a simple yet haunting treat.
Let your imagination soar with these creative cookie ideas. Turn your kitchen into a Halloween dreamland. Impress your friends with your amazing baking skills.
Conclusion
Spider web cookie stamp cookies are a fun Halloween baking treat. They are easy to make and can impress anyone. Try different colors and patterns to find your favorite.
These cookies are perfect for Halloween. They can be simple or colorful, depending on your style. They’re great for parties or as gifts.
Ready to make some spooky cookies? Get your stamps and oven ready. Happy baking and let your creativity shine!
FAQ
What are spider web cookie stamp cookies?
Spider web cookie stamp cookies are a fun Halloween treat. They have a spider web design. You can make them with a cookie stamp or royal icing.
What supplies and ingredients are needed to make spider web cookies?
You’ll need a spider cookie cutter and black and purple gel food dyes. Also, icing bags, tips, buttercream frosting, and sugar cookie dough. Don’t forget a nonstick pizza pan, parchment paper, and decorators gel.
How do you make the spider web design on the cookies?
Start by piping white icing or decorators gel in concentric circles. Then, use a toothpick to draw lines from the center. This creates the web effect. You can play with different icing shades for more detail.
What are some tips for preparing the perfect cookie dough base?
Use a no-spread sugar cookie recipe. Make sure the dough is soft but firm. Chill it before rolling and cutting to avoid spreading.
How can you store and display the decorated spider web cookies?
Store them in an airtight container at room temperature for up to a week. Freeze undecorated cookies for up to 3 months. Display them on tiered stands or themed platters. Add fake cobwebs and plastic spiders for a spooky look.
What are some common issues with cookie decorating and how can they be fixed?
Issues include runny or thick icing, bleeding colors, and uneven surfaces. For runny icing, add powdered sugar. For thick icing, add water. Prevent color bleeding by letting each layer dry. Use a spatula to level uneven icing.
What are some creative variations and design ideas for Halloween cookies?
Try designs like pumpkins, ghosts, or witch hats. Use marbling techniques or edible markers for details. You can also make a large cookie pizza with a spider web design.


